
I’m ready to admit it now; I might have a tiny addiction to animation triggers in PowerPoint. The games are just so fun to make! And my students have been so engaged every time we play one! If you missed out, catch up with the free templates and step-by-step directions for Guess The Word and Feud. As fun, as those two games are, and as much as my students have been enjoying them, the hands-down favorite of my adult students is Fortune Hunting.
The play of the game has some similarities to Wheel of Fortune. However, a picture clue can be included to help students. Here are two videos demonstrating the game, one with a picture clue and one without.
Looks like fun, right? Thus far, I’ve tried the game out on four different groups of students in a formal academic setting (the college where I work) and a non-academic setting (the employees of a company where I teach English after work). The students have ranged in ability from absolute beginner to nearly native proficiency. All of the students gave the game a thumbs up. Specifically, my beginners prefer Guess the Word to Fortune Hunting, but my advanced students like Fortune Hunting or Feud. The intermediate students were happy with all three games but did lean more toward Fortune Hunting with picture assists over the other options.
Before I get into the details of this game, a reminder. These games all have animation triggers built into them. This is not a Google Slides supported feature. Therefore, you must use them in PowerPoint for them to work correctly.
Directions for Playing Fortune Hunting
To play, you will need to keep score separately, either on a sheet of paper or whiteboard. Here are the specific directions I include in the template. The game can be played by individual students or in teams.
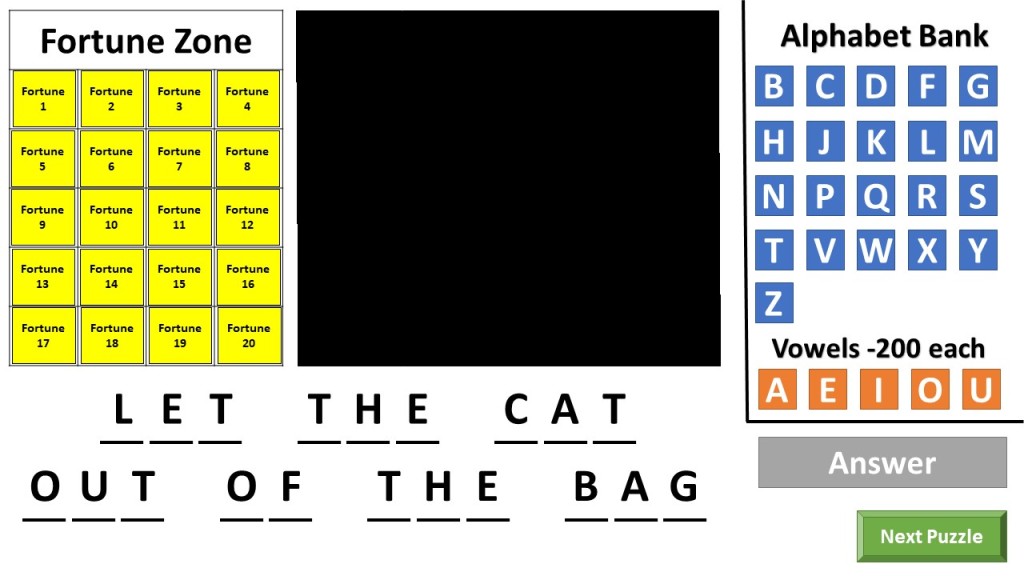
1. Each slide has lines indicating the number of letters in the word, a picture clue that is covered up and revealed as letters are clicked, a fortune zone, and an alphabet bank that is divided into consonants and vowels.
2. On a player’s turn, he/she will click in the fortune zone. This will reveal the number of points the player will earn if he/she chooses a correct consonant. It will also reveal one piece of the picture clue. There are four negative fortunes (red in color). If a negative fortune is revealed, the player’s turn immediately ends, and the next player gets to choose a fortune. If the fortune is positive, proceed to step 3.
3. The player then chooses a consonant by clicking on the chosen letter in the consonant bank. Once clicked on, the consonant will disappear, and if it appears in the target word, it will appear in the word.
- If the player clicks on a letter that is in the target word, the player scores the number of points he/she revealed in the fortune zone times the number of times the consonant appears in the word (so if the player revealed 100 in the fortune zone, clicked T, and there are three T’s in the word, the player would earn 300 points). The player also has a choice of how to proceed, as explained in step four.
- If the player clicks on a consonant that is not in the target word (the consonant disappears and does not show up in the word), the player’s turn is over, and the next person takes a turn by starting with step two.
4. If the player chooses a consonant in the target word, after totaling his/her score, he/she has a choice as to how to proceed:
- He/she may buy a vowel.
- The player states that he/she would like to buy a vowel.
- 200 points are subtracted from the player’s score.
- The player clicks on the desired vowel. The vowel will disappear from the alphabet bank and, if in the target word, appear in the word.
- He/she may choose again from the fortune zone and select another consonant, proceeding as outlined in step three.
- He/she may try to solve the puzzle.
- The player states what he/she believes to be the correct answer.
- He/she clicks the “Answer” button to reveal the correct answer.
- If correct, the player earns 1,000 points.
- If the player is not correct, he/she loses 1,000 points.
- He/she may pass the turn to the next player, who starts with step two.
5. If a puzzle has not been solved after all 20 fortunes have been revealed, the player whose turn it is currently must try to solve it. Correct answers are worth 500 points. Incorrect answers are negative 250 points.
6. Once a puzzle has been solved, whether correctly or incorrectly, players click “Next Puzzle” to move to the next puzzle. Play continues until all the puzzles have been solved.
7. The winner is the player with the most points at the end of the game.
I know it sounds a little complicated, but it’s really not. Students get the hang of the game very quickly, especially if you play as a whole class the first time, and they become very invested in trying to score as many points as possible. Now, onto using the template to create your own games. You can download the file from below the picture at the beginning of the post or from the links section at the end.
Directions for Using Fortune Hunting Template
Things that are already completed:
- The Alphabet Bank letters are already animated and triggered, so they will disappear when clicked on.
- The picture cover boxes are already triggered to disappear when a Fortune is clicked.
- The fortune cover boxes (yellow) are already animated and triggered to disappear when clicked on.
- The letters on the lines (currently all X’s) are already animated to appear with the previous animation. These are rectangles 119-132. These directions will help you trigger them to appear when the corresponding letter in the Alphabet Bank is clicked.
- The Answer cover is already animated and triggered to disappear when clicked on.
- A clear slide cover that is hyperlinked to the slide.
- You will want to copy and paste the slide as many times as necessary for your game, one slide per word.
- On the last slide of the game, change the words “Next Puzzle” To “End Game.”
On each slide, you will need to do the following:
- Hyperlink the slide cover to the correct slide. (the first 20, slides 4-23, are done for you)
- Right-click on the background of the slide to select the clear slide cover.
- Click Edit Link
- On the Place in This Document tab, click Slide # (the number of the slide you are working on).
- Click in the gray area to deselect the rectangle.
- Add a picture
- Copy and paste the picture or insert a saved image from your files.
- Crop and resize the picture so it is the same size as the picture covers (blue and orange).
- Right-click on the picture. Click send to back.
- Set the point values in the fortune zone. You want to change these for each slide/word so students don’t memorize where the various values are located. (the first 20, slides 4-23, are done for you at 50-point increments, 50-500, and four negative fortunes of -100, -200, and to Lose a Turn)
- I generally do 25-point increments from 25-500. You could also put things such as “Lose A Turn,” “Lose All Your Points,” and negative point values in the Fortune Zone as well.
- I put the point values/penalties I’ve chosen into a random list generator.
- Click on the edge of the Fortune Zone table to select it.
- Right-click on the Fortune Zone table and choose Bring to Front.
- Click in the Fortune 1 cell, and type the point value.
- Work your way through each cell, entering each point value.
- Click on the edge of the Fortune Zone to highlight it.
- Right-click and click Send to Back. This should bring the fortune covers to the top, obscuring the view of the point values.
- Set the answer.
- Double click on the black word “Answer”
- Type the correct answer to the puzzle.
- Double-click on the word(s) and adjust sizing if needed.
- Right-click on the answer.
- Click Send to Back. This will hide the answer behind the gray cover. You’ll know it’s successful because you’ll be able to read Answer in white.
- Enter your target word.
- Double-click on the first X and type the first letter of your word. Click on each subsequent X, typing each subsequent letter.
- Select and delete any extra Xs and lines.
- Select and drag the target word’s letters to center it on the screen.
- Trigger the animation of your target word.
- Click on the first letter of your target word.
- Click Animations
- Click Trigger
- Choose the corresponding rectangle. Use the chart in the links section and downloadable directions to help you. (Example: if the first letter of my word is T, I would click on the T, Animations, Trigger, Rectangle 20.)
- Repeat these steps for each of the letters in your target word.
- Move things to the back so they are not clickable. This prevents students from advancing the game by clicking random places on the slide. The only clickable locations will be the fortune covers, letter tiles, answer cover, and the Next Puzzle button. Only the Next Puzzle button will advance the slide.
- Select the letters and lines.
- Click in the gray area above and to the left of the target word.
- Drag the mouse down and across so the entirety of the target word and lines, but nothing else is in your selection box.
- Release the mouse button so everything is selected.
- Right-click on one of the letters.
- Click Send to Back.
- Click anywhere else on the slide to deselect.
- Select the letters and lines.
Conclusion
As with Guess the Word and Feud, the first few times I made a Fortune Hunting game, it took me quite a while, but now I can make a twelve-round game in only a couple of hours. Thus far, I’ve made four versions of the game: Inspirational Quotes for Back to School (the only one without picture clues), Idioms, Very + Adjective Synonyms, and Very + Adjective Antonyms. In the future, I hope to make more for skills such as collocations, similes, and more. If you make your own version, be sure to let me know how it goes! Happy teaching, everyone.
