Welcome!

The Gaming Grammarian...because grammar needs game,

Welcome to The Gaming Grammarian. Teaching English language learners is a passion of mine and something I’ve always enjoyed doing. Teaching grammar is more of an acquired taste. However, I have learned that teaching and learning grammar can be fun, and I am happy to share some of the things I’ve learned with you. You’re welcome to read posts in order (typically, I have a new post every week Sept.-May and every other week June-Aug.), but you might find it easier to use the categories to focus on the topics you want to read about. Another option is to use the search box to find posts and activities relating to specific skills. I would like to inform you that this site is part of the Amazon Affiliates Program, so posts may contain affiliate links. However you choose to explore, please feel free to reach out if you have any questions. Happy teaching, everyone!

Realia in the Classroom: Business Cards

genius bitmoji

One thing I, and most language teachers, try to do is make my lessons as authentic as possible. One way I do that is by using realia (real-life objects, not materials made for teaching) as much as possible. I find this is especially important when teaching adult learners. Much more than my teenage and elementary students, my adult students want lessons that are practical and include language that is as authentic as possible. One commonly available piece of realia that I use is the business card. Here are a few of the activities we use them for.

Numbers 0-9

Finding activities for older learners to practice basic skills such as numbers is not easy. I have a few fun games for practicing reading and writing larger numbers, but not as many for single-digit numbers. One that works well, though, is one for which we use business cards. It’s also another example of game smashing (combining pieces of other activities/games to make a new one). To play this game, I use a commercial game board and pieces. Some of our favorites are Chutes and Ladders, Trouble, Candy Land, and Sorry, but you can use any game board and pieces–you don’t even need the same board for every group, just so each group has one. Each group will also need a variety of business cards. These can be placed in a face-down pile or put into a container of some sort (I’ve found an empty tissue box works well). On his/her turn, the active player takes a business card and states a sentence: “The phone number for Pretty Garden Florist is 249-034-0682.” Or “Pretty Garden Florist is located at 3478 Main Street.” He/she then rolls (or pops or draws a color card…) and moves his/her piece.

What I Can Buy

A common unit theme for level one books is shopping. Students usually practice community places, nouns, and the simple present tense. Another game smash activity, What I Can Buy, is a fun practice to go along with this unit theme. As before, besides a set of business cards, you’ll need a game board and a set of playing pieces for each group. If you don’t want to use classic game boards, you can use the Zig Zag Game Board Template (free download below the picture), which I use for many games. On his/her turn, the active player draws a business card. This time, he/she states an item that can be bought or a service that can be arranged at the location, “At Bill’s Garage, you can have your car fixed.”

More advanced students can have a conversation in which the student whose turn it was previously pretending to be a business employee, and the active student pretends to be a customer. The active student asks questions and makes a purchase or arrangements to have a service performed. I encourage my students to try and talk for at least thirty seconds before rolling and moving.

Directions Around Town

bitmoji reading a map

This final game is not new; I first introduced it in October 2022. To play, you’ll need the same items as the previous activities (business cards, game board, and playing pieces) and maps of your community (usually available at the local tourist office or from the local business association). It, too, practices some needed vocabulary, this time giving directions and prepositions.

I’ll let you read the original post for the full directions and just give you the short version now. To play, use an extra playing piece and put it on the map at a random location. The active player draws a business card, locates the business on the map, and then gives another player (who moves the piece on the map) directions to get to the company. This can also be combined with either of the above tasks of reading off contact information, stating what might be purchased at the location, and/or roleplaying a conversation that might take place at that business.

Conclusion

So, how do I obtain all of these business cards? As I’m going about my daily life. I pick up business cards whenever I’m out shopping, running errands, or accomplishing routine tasks such as having my car serviced. I only need a few from each location, and business owners are always happy to help. Since my family and friends have learned about the many ways I use them (another piece of “trash” that is actually a teaching treasure), they collect them for me, as well. Start your collection and try one or more of these activities. Happy teaching, everyone!

What are You Eating?

It doesn’t happen often, but every once in a while, I feel like an educational miracle worker or at least an educational genius. One year, the science and health/PE teachers came to me and said the ELLs were struggling with the cross-curricular unit they were teaching about nutrition. They asked me to do something to help them.

At about that same time, the math teacher came knocking on my door, talking about how the ELLs were not understanding percentages or even adding and subtracting decimals, for that matter. She, too, wanted me to do something to help them. The next teacher to come around, the ELA teacher, thankfully, wasn’t reporting that the students were struggling, but she did want to give me a heads up that a new unit was starting and the students would need to write a reflective essay at the end. If I had time, she thought it might be helpful for them to work on the essay with me. Four teachers doing three very different units, and all wanted me to do something to help them and our students. Oh, and then there were the language acquisition objectives that I still needed to meet because these were beginning-level language learners. I really didn’t know what to do, but I knew I had to do something. This nine-day mini-unit was the result.

Day One

Food Journal template for Nutrition and Percents Mini-Unit
Small food pyramid for student cut-and-paste activity.

Every day, for the first five days of the unit, students kept a food journal, recording everything they ate and drank during the five days. This journal later becomes the pre-writing for a reflective essay about their food choices (helping out the ELA teacher). Also, on day one, we practiced food vocabulary (my language objectives). First, we used the cards from Appetizing Adjectives: The Board Game to classify foods by their food group (helping the science and PE teachers) with a pocket chart. I labeled each section of the chart with a food group, and students took turns drawing a card and placing it in the correct pocket. Prior to class, I made up a poster-sized food pyramid for each pair of students and gathered grocery ads. After the whole group practice, the students cut pictures from the ads and glued them into the correct sections of the pyramid, labeling them with their names. This activity is similar to the food quilts I’ve done as part of my appetizing adjectives lesson, but rather than focusing on adjectives, we focused on the vocabulary of food categories (dairy, grain, meat, etc.).

Day Two

On day two, I reminded students to continue completing their food journals, and we expanded our vocabulary practice to include quantifiers (more language acquisition objectives). After reviewing the relevant vocabulary, we played two different games. The first, from ESL Galaxy, asks students to name a food that matches the quantifier of the space on which they land. For the second game, we again used Appetizing Adjectives: The Board Game. This time, when a student drew a card, he/she named the quantifier that would go with the food on the card (a head of broccoli, a bunch of bananas).

Day Three

Kids food group servings graphic from Nourish Interactive

For this day, I used a couple of resources from Nourish Interactive. We used the food group healthy serving size sheet and the food group servings and amounts sheet to discuss portion/serving sizes and how they relate to the food pyramid/plate. After discussing this, we used paper plates and a

construction paper circle (the glass) glued on a larger piece of construction paper (the tray) to create our own MyPlate. The students cut pictures from a grocery ad to classify their favorite foods and/or make a healthy meal (helping out the science/PE teachers again).

Day Four

What am I eating today graphic organizer from nutrition and percents unit plan

Now that students better understood what it means to eat in a healthy manner, it was time to start applying this knowledge. We used the government’s MyPlate Plan online activity to develop a personalized eating plan. They then used the graphic organizer to decide what they would eat each day for an entire week. I told them not to worry about specific ingredients but to pay attention to portion size and the serving guidelines we learned about the day before.

Day Five

How much am I eating graphic organizer from nutrition and percents mini-unit

I hadn’t forgotten about the math teacher’s request, and on day five, we started to do some math. First, we reviewed the percentage formula (number of servings divided by the total servings for the day/week multiplied by one hundred). Then, students determined what percentage of their daily servings should come from each food group. They then transferred the meal plan they made in the previous lesson to a MyPlate graphic organizer, listing the food and the number of servings. Finally, they determined what percentage of their servings came from each food group and compared it with the government recommendations. The students required a fair amount of support at first, but by the end, they were getting quite good at using the formula.

Day Six

Now that our food journals were complete, we took day six to work on our reflection essays (helping the ELA teacher). Students used their food journals as reference material and wrote an essay answering the prompt: “Was your eating over the last five days healthy? Why or why not?” I encouraged them to use evidence from their learning about nutrition to support their answers. Besides the food journals, I also encouraged students to use a CER graphic organizer to help them organize their thoughts before writing.

Days Seven and Eight

What should I buy graphic organizer from nutrition and percents mini-unit

I had warned students ahead of time that we would be doing this project so they could ask their families for recipes and come prepared with an idea of what groceries they would need to put on their lists. Before beginning work, I told students that they would not need to buy certain basic supplies (flour, sugar, spices, oil, and butter) because they were “already in the kitchen.” Students then used their meal plan to create a grocery

list, including quantities for each item. The list was then used as a reference as they looked through ads and used grocery store websites/apps to record the price per item and the total cost for the amount they would need. It took us two days to make a grocery list, look up prices, do the math for the budget (I told them they could only spend $150), and make adjustments to the overall plan.

Day Nine

How much am I spending graphic organizer for mini-unit

On the final day of our unit, I wanted to practice percentages again. I asked students to figure out what percentage of their budget they spent on each food group. They used their grocery shopping list to help them get organized and underlined each item with a different color of pencil based on the food groups. They then did the math to figure out the total spent on food from each group and recorded it in the graphic organizer. After this, they figured out the percentage of their budget spent on each food group. We even snuck in some graph-making practice by creating a circle graph to represent their budgets visually!

Conclusion

This unit turned out to be a lot of fun, and I’ve used it a couple of times since. Recently, I revisited it and refreshed all of the graphic organizers. If you don’t have the time (or desire) to make your own graphic organizers for the unit, you can grab mine by clicking any of the pictures. Happy teaching, everyone!

Tax Time: Teaching USA Coins to All Students

It’s tax season in the USA. If you teach adult learners, as I do, I recommend reminding them, especially your new arrivals, of the deadline so they don’t accidentally cause themselves a problem or end up with extra fees. With all of the money talk, it’s also a great time to do a lesson or two about the names and values of coins in the USA. Most of us may not use coins anymore, thanks to debit and credit cards, but many of our students still do, and it can be a lot to remember.

Teaching K-12 Students

Teaching the names and values of USA coins was a regular and relatively easy part of my instruction when I taught K-12. I could combine the vocabulary lesson with our math lesson, and the fact that decimals and percentages were involved meant I could also make it fit with my lessons for older students. As with many math activities, we’d read various picture books and other forms of children’s literature. I also used a variety of activities, such as:

Teaching Adult Students

When I switched to teaching adults, I spent less time teaching USA coin vocabulary and values, but have since realized this was a problem. One day, I happened to be in a store and saw one of my students. She couldn’t figure out how much money to give the cashier, so she just held out her hand with various coins in it. Thankfully, the cashier was kind, patient, and honest and helped my student, eliminating the need for me to insert myself and potentially embarrass my student. Observing this taught me something, though. If anything, my adult students, especially my newly arrived adult students who are less likely to have debit and credit cards yet, need this practice.

Another thing that helped to reinforce in my mind the need to work with adult students on this topic took place in one of my advanced classes. We were reading a short article that compared the size of something to a dime. One of my students asked, “Which one is a dime?” I asked the class if anyone could answer the question and quickly discovered that not one of my 20+ students knew which coin was a dime or how much a dime is worth. In the next class, we spent the entire two hours learning the names and values of all the coins and discussing other financial questions, such as how to read a paystub, complete a W-4 form, what a 401K is, and more. At the end of the semester, more than half of those students specifically mentioned on their course evaluations how thankful they were for that class period.

USA Coin Puzzles

My adult students generally don’t need to practice their math skills. They are more than capable of adding coins to a specific total, subtracting to figure how much change they should receive, and multiplying to determine their total pay (though they also bemoan the shrinkage between the gross payment earned and net payment deposited). Therefore, I don’t need to use activities such as Hungry Piggy Banks or USA Coin Clip Cards. Instead, one of my go-to activities is USA Coin Puzzles.

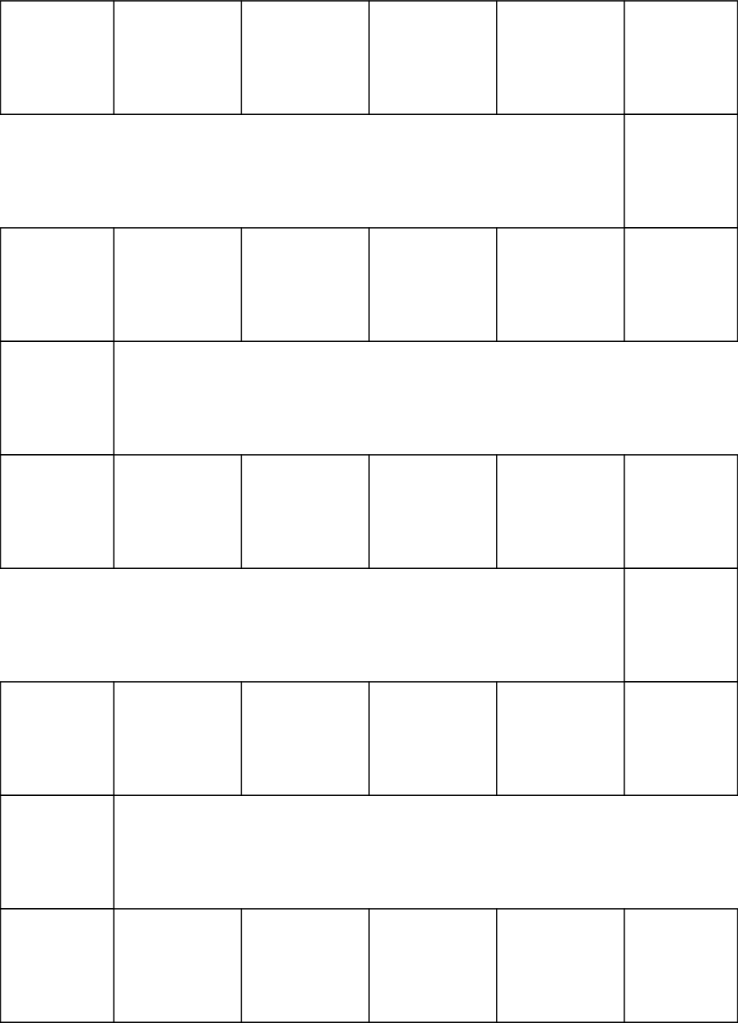
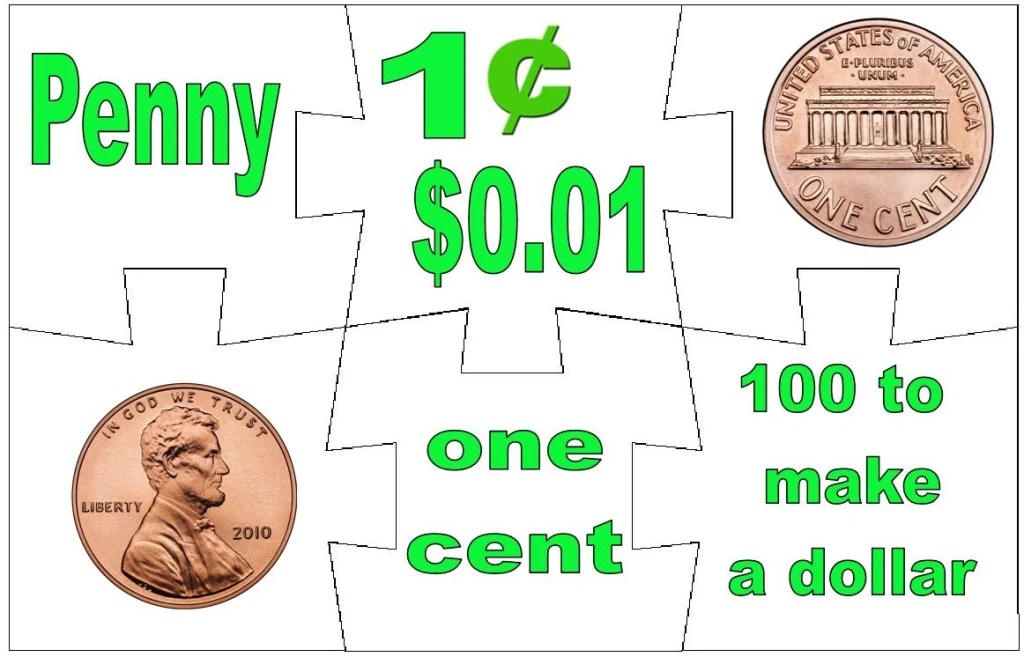
These six-piece puzzles review the name, value, and look for each coin. Starting from the top left, the pieces have the name, value as a number and a decimal, the back of the coin, the front of the coin, the value in words, and the number it takes to make a dollar.

There are six puzzles: penny, nickel, dime, quarter, half dollar, and dollar bill. Students generally work in pairs to complete the puzzles, making for a nice, low-key practice activity. When I taught K-12, I would ask students to complete a recording sheet. They’d cut out pictures I provided them of each coin’s front and back to paste in the first two columns after the name. Then, they’d write the value in words and as a number and decimal. Finally, they’d record the number necessary to make a dollar. I do not use the recording sheet with my adult students, but I will often make copies of the answer key to use as a handout (free download under the puzzle picture) after they’ve completed the activity.

Conclusion

One class period is far from enough practice with this skill, but unfortunately, it’s usually all I can spare with my current classes. When I teach community-based classes, I spend much more time on it and use more of the children’s literature and other activities from my K-12 teaching days. Even if you think there is absolutely no time to spare for this lesson, I encourage you to try and find at least one or two hours to practice. Your students will appreciate it. Happy teaching, everyone!


If you think you’d like to get all of the activities I have developed for practicing the names and values of USA coins, I have two bundles for you to choose from. The first is paper-based resources, and the second has digital versions. Both give a 20% discount on the individual resource cost.

Use of L1 in School

If I had to choose the topic I see the most discussion about on various forums, it would probably be students’ use of their first languages in school. It’s a difficult question. On the one hand, we need students to learn English, both for their own sake and ours. On the other hand, we know that many linguistic skills transfer; thus, students’ English abilities will only be enhanced and strengthened by their proficiency in their first language. So, how do we find the balance? After more than two decades in the field, I can assure you I do not have the perfect answer. However, I do have thoughts informed by experience, and I’m happy to share them with you.

My thoughts (and conversations with students) generally come down to time, place, and people. When deciding what language we should use, we need to consider the time and place and people involved in the interaction. I usually explain it to my students using examples from their lives. I ask them something such as, “Do you speak and act at your grandmother’s dinner table the same way you do on a picnic with your friends?” or “Do you speak in a meeting at work the same way you do when watching a sporting event at a bar with your friends?” The answer is always “No.” I then ask them why not, and they tell me about how they are with different people and doing different things (or about how their grandmother would punish them or their boss would fire them). We then go on to discuss how this applies at school. We need to consider where we are, what we are doing, and who we are with. These factors will then determine how we should speak, including which language we should use.

Time & Place

The part of the school day is a factor that must be considered. If we are in class or doing academic activities, we should be trying to use English. English is the language of instruction (assuming one is not in a bilingual school/program), the language of assessment, and will likely be the language of our students’ current and/or future workplaces. Therefore, English should be our primary language at this time. That doesn’t mean that the use of students’ first language is forbidden or should be punished. There is nothing wrong with getting a brief clarification from a friend or instructor who speaks your first language. There is also nothing wrong with quickly translating a word here or there. What we do not want to do, though, is create a dependency on translation. The early days will be rough, very rough, but it is too easy to become dependent on human and machine translation. I have had many students still using fully translated materials and unable to communicate effectively in English after multiple years in US schools. That is a problem. An overreliance on translators and translated materials can also create an inequitable learning environment. Learning materials and bilingual instructors are relatively easy to come by for some languages. But what happens when a student who speaks a different language, a language that is more difficult to access materials in, moves into town? Or what about programs with a dozen (or more) languages represented? It is far better to start with the expectation that English is the language of academics than to risk having a problem later.

People

So if English is the language of academics, that means students are free to use their first languages in non-academic settings such as lunch, right? Yes and no. This is where the other people involved in the interaction need to be considered. In social settings, using the majority or most common language is just plain polite. It is rude to purposefully leave people out. If everyone in the group speaks the same first language, use it! If not, then the default should be to the majority language of the country, which, for us here in the USA, is English. A few years back, I saw a beautiful example of this in my middle school classroom. I noticed that a group of my female students kept showing one another things on their Chromebooks, and they didn’t seem to be making much progress on the assignment. I walked by them, trying to see what they were doing, and noticed that every one of them had Google Translate pulled up. I stepped away but kept watching, and what they were doing soon became apparent. Four girls spoke Spanish, one spoke Arabic, and another spoke Mandarin. Since they were all new to English (less than a year of exposure for most), they were using Google Translate to facilitate their conversation. The four Spanish speakers had realized that the other two girls were being left out and voluntarily stopped speaking in Spanish, switching to English. Initially, the conversation was about the assignment. Later, it turned to chatting about typical teenage topics (mostly which of the boys in class they thought were cute). Whenever someone couldn’t remember or didn’t understand an English word (which was often because they were all so new to the language), they’d use Google Translate, translating each word or phrase three times. It was a beautiful example of thinking about who you are with and factoring that into your decision about which language to use.

Conclusion

Does asking students to consider where they are, what they are doing, and who they are with answer all of the questions regarding the use of their first languages in school? No, of course not. But it does help me to decide when to push students to use English and forego translation options and when to “just let it go” for a time. It also helps students begin to think through these things and make these decisions for themselves before they enter the workforce and the stakes become much higher. Happy teaching, everyone.

Active and Passive Voice Task Cards

Active and Passive Voice Task Cards
Active & Passive Task Cards: Paper
Active and Passive Voice Digital Task Cards
Active & Passive Task Cards: Digital

My students never really mind learning how to distinguish between the active and passive voice. They don’t even mind learning to speak and write in the passive voice too terribly much. What they do mind is trying to rewrite sentences in the opposite voice! Since, for some inexplicable reason, every intermediate and advanced curriculum I teach includes a unit that focuses on this very skill, I decided it was time to make things a little more fun and sneak in some exposure to popular children’s literature here in the USA.

Since the final skill I wanted to practice was writing, this particular set of task cards didn’t lend themselves to being as multi-play as most of my task card sets do. Thus, they are just task cards, but if you want a more creative way to use them, you can try one of the five alternative uses ideas from the November 2022 post.

The paper version of these cards is designed in black and white. I did this for two reasons. First, it makes it easier and cheaper to print them. You can even use a copier to print them if you happen to have one that doesn’t jam when you put cardstock in it. Second, this allows you to print them on different colors of cardstock. As I share in my post of tips for printing your various activities, printing each set on a different color of cardstock makes it easier to return cards found on the floor, under books, and in other random spots to the correct set.

Initially, I ask students to read the sentences and record either active or passive on their recording sheet. After they become more proficient at distinguishing between the two, they work on converting between them. For that exercise, I use the second recording sheet, where they rewrite the sentences in the opposite voice (active became passive, passive became active). Some of the passive sentences do not include an agent. For those sentences, I tell students they can create their own agent.

So, what makes these task cards fun? I based them on popular children’s literature stories, specifically those Dr. Seuss wrote. My students who have children and have lived in the USA for multiple years generally recognize the characters and think it’s cute. Because Dr. Seuss’ books have been translated so often, students who haven’t been in the USA for quite as long or don’t have children also recognize many of the names and have fond memories of the books. These task cards are among those students often request a downloadable copy of be added to our LMS so they can use it at home. I’ve even had a decent number tell me they used them with their children, who also enjoyed them.

The digital version is slightly different. First, because these task cards aren’t printed, I gave them a fun background. Each slide in the set includes four different “cards.” Each “task card” has a sentence, an X to drag and drop into the correct box to identify the sentence as active or passive, and a text box where students can type the sentence in the opposite voice.

While these task cards don’t make my students say, “I love changing sentences from passive to active and active to passive!” they do make the practice a lot more fun. Happy teaching, everyone!


Family Relationships Vocabulary Practice Activities

Family tree from Family Relationships Grid Conquest Game

Family relationship vocabulary can be very difficult to teach. The definitions are complicated, and explaining the various relationships requires the very vocabulary you’re trying to teach. Thankfully, I’ve been able to develop some activities over the years that have helped my students learn the large amount of vocabulary they need for this topic.

Family Relationship Vocabulary Activities

Family Relationship Clip Cards from the vocabulary activities pack.

I started with a set of my standard vocabulary activities. As I’ve explained previously, I try to always start with the same set of activities, changing only the vocabulary. This allows students to concentrate on the vocabulary and definitions rather than the activity directions. The first couple of times we do a particular type of activity, it takes some explaining and extra assistance on my part, but after that, all I have to do is pass out the materials, and students are able to get straight to work.

The types of activities I always include in my vocabulary packs are:

  • sort cards (we use these for a variety of activities)
  • clip cards
  • Match Up Cards (go with the boards my father specially designed for me; the plans are free in the linked post)
  • Scrambled Words
  • CD Spinner for various games (go with the spinner stands my father designed for me; the plans are free in the linked post)
  • Worksheets (cut-and-paste, crossword, cloze, word search, alphabetical order, assessment)

I generally only use all of the activities when I am doing a full vocabulary unit. With my adult classes, we generally only spend two or three lessons on a particular theme, so I pick and choose which activities will best help my students and fit within the time constraints of a given curriculum.

Family Relationships Guess the Word PowerPoint Game

Fortune Hunting is still my students’ favorite triggered animation PowerPoint game, but Guess the Word is a very close second. This is a Hangman-style game without the potential trauma triggers of the original game. Students choose letters and try to guess the word based on either a picture, a picture and definition, or (as is the case in this version) a definition. You can see a demonstration in this YouTube video. If you want to try making your own game, the directions are in the original post, and the template is available for download under the picture.

Family Relationships Grid Conquest Game

I use a lot of different versions of Grid Conquest. The game is relatively simple: students claim a starting corner and then color in connecting sections as they successfully complete whatever task is required. For this version, though, I needed more than just a set of task cards and the game board (free download below the picture); I also needed a couple of family trees.

Over the years, I’ve found that using a physical family tree with pictures helps students when they are learning family relationship vocabulary. Seeing the relationships is a lot easier than trying to use the very vocabulary you’re trying to learn to describe the relationships! Having two family trees, one with and one without divorce and remarriage, also allows me to narrow or broaden the set of relationships students are learning. More advanced students get practice with terms such as step-brother and second cousin, while beginning students can stick to more basic vocabulary such as sibling and grandmother. I love that I can even use this game in mixed-abilities classes because the play is the exact same no matter which family tree and card set I give the group.

To play, a student draws a card that names a family relationship (brother). The student then looks at the family tree and makes a sentence naming at least two people who are related in that way (David is Melissa’s brother.). If successful, the student is able to color in another section on his/her journey across the board. At the end of the game, students add up the numbers in their colored squares, and the person with the highest number is the winner.

Family Questions Board Game

If you’ve been reading this blog for any length of time, you know I love a game that practices more than one skill. I was working with a new curriculum that taught question words in a unit that was themed around families. Since I knew this particular class needed to review family vocabulary, I decided to make a game that practiced both. I was able to combine several existing resources and templates (the family relationship sort cards, my zig-zag game board, and the question word spinner from my Picture Prompts Board Game), so the game came together quite quickly.

To play, students drew a family relationship card (the sort cards) and spun the spinner. The active student then asked the next student a question, using the question word spun and the relationship shown on the card (What is your grandmother’s name?). After asking the question, the student moved his/her piece the number shown on the spinner. Before drawing and spinning, the next student answered the question asked of him/her. He/she then drew, spun, and asked a question of the next student. Play continued in this manner until someone reached the finish.

After playing the first time, I made a couple of adjustments to the game. First, I created a new set of cards with family relationships on them. This was simply because my students preferred smaller cards. Second, I created a separate board where each square lists a family relationship. Using this game board eliminated the need for the sort cards but removed my ability to customize which relationship vocabulary each group practiced. Since that first time, I’ve chosen which version of the game to use based on class make-up (and sometimes I use both–once again allowing me to use the game in mixed-ability classes).

Conclusion

These activities and games don’t lessen the work required to learn the vocabulary of family relationships, but they do make the process more fun! If you’re interested in trying them all out, the last button will take you to a bundle that will get you access to all of the activities in one download and at a 20% discount. Happy teaching, everyone!


Fun With Parts of Speech: Match Up Cards

I’m not a huge proponent of having students identify each word in a sentence by part of speech. Maybe it’s some sort of leftover fear or revolution from my days in ELA class when teachers made me diagram sentences, but it is extremely rare I ask students to do anything remotely similar. I just don’t see the value in it. That said, I do know it is important to generally understand what each part of speech is and does. I also believe it is essential to be able to identify a word’s part of speech, at least at some times. Therefore, I have a quick reference handout (free download below the picture) and a few activities that ask students to identify the parts of speech of various words. I’ve tried to make them as fun as possible, and my students generally respond positively to them. This particular activity, Parts of Speech Match Up Cards, is the least active one I have, but it is the one I use most often with my older learners.

Match Up Boards

Match Up Boards are an invention of my father’s. I give the complete backstory in the post, Match Up Boards, from May of 2022. The important things to know now are that they are very easy to build, and the instructions for doing so can be downloaded from below the picture.

You create the cards (or buy some pre-made ones), and students slide them into the boards and use rubber bands to match the two sides; they then remove and reinsert the center card to check their answers.

Parts of Speech Match Up Cards

Parts of Speech match up game card to match eight different parts of speech with their definitions.

If you don’t feel like making your own cards, you can get the set of four cards I use with my students. If you want to create your own, here’s what I included on my cards:

Card One

Like all the cards, this one has eight parts of speech (noun, verb, pronoun, adjective, adverb, conjunction, article, preposition) listed on the left side. The right side has definitions for the parts of speech. Students use rubber bands to match the terms to the definitions.

Cards Two-Four

These three cards also have eight parts of speech listed on the left side. The right side is what is different. Each card has a different set of eight words, one for each of the eight parts of speech. Students use rubber bands to match the part of speech to the example word. The included words are:

Card Two

  • the
  • at
  • quickly
  • blue
  • she
  • house
  • but
  • run

Card Three

  • is
  • girl
  • and
  • slowly
  • up
  • he
  • tall
  • an

Card Four

  • a
  • big
  • so
  • through
  • talk
  • carefully
  • dog
  • they

Conclusion

As I mentioned in the beginning, Parts of Speech Match Up Cards is my least active activity. In the future, I’ll share posts about some of the more active games and activities we use, such as Clip It Or Pass It, Parts of Speech Land, and Parts of Speech Pisces. Until next time, happy teaching, everyone!

Direct and Indirect Object Practice

Picture Prompts Board Game

When I first created my Picture Prompts Board Game, I thought it would be a fun way for students to practice using question words and describing cause and effect. It was! Since then, I’ve used it to practice a whole host of other skills: adjectives, compound and complex sentences, general speaking practice, and forming sentences in every verb tense in the English language. Today, I’d like to share with you yet another way I recently used the game.

This particular use was inspired by a game called Who Verb What by Cool English. In his game, students look at a picture and identify the who, the verb, and the what. I thought, why not take it further? Why not have students look at the picture and then form a sentence with only a direct object or both a direct and an indirect object, depending on what number they rolled? Since I already had the game, it was easy to make the adjustment. The first time we tried it, I just put a roll key on the board (even = direct object only, odd = both direct and indirect object) and let the students try it out. Since the feedback was positive, I made some paper key cards, spinner labels, and “cheat” cards. You can download all of these things, along with directions for making your own CD spinner stands, at the bottom of the post.

The directions I give students are very similar to all of the other versions of the game:

  1. Roll the number cube to determine if you will state a sentence with only a direct object or a sentence with both a direct and an indirect object.
    • even number = direct object only
      • The player kicked the ball.
    • odd number = both a direct and an indirect object
      • The player kicked the ball to his teammate.
  2. Take the top card and state a complete sentence about the picture.
  3. If the other players agree your sentence is grammatically correct, move your piece the number indicated on the number cube.
  4. Place the picture at the bottom of the pile.

Using a game to practice multiple skills is not unusual in my classroom, but I think this might be the game I’ve used to practice the most skills! Give Direct and Indirect Object Picture Prompts Board Game (or one of the other versions) a try and see how your students like it. Happy teaching, everyone!


March Madness Fun

bitmoji with a foam finger

I’m not a basketball (or any other sport) fan. But it is almost March, and that means the college basketball championships will soon be upon us. Since bracket fever seems to grab everyone and envelope everything, I wanted a way for my students to gain first-hand experience with them and begin to understand how the system works.

The Why

Honestly, I don’t care at all if my students are or become basketball fans. However, I do care if they understand what is happening around them and gain the knowledge and vocabulary necessary to join in conversations with their English-speaking peers (if they so choose). Therefore, I try to find creative ways for them to gain first-hand experience with various aspects of our culture. In March, one of those culturally significant things in the USA is March Madness.

The How

March Madness Ice Cream Elite Eight bracket

One of the ways to participate in March Madness is by filling out a bracket. Many of my ELLs have no (or little) experience with the type of bracket used in the tournament, so I wanted to give them some practice with it. To do this, I decided to hold our own Sweet Sixteen Tournament. The first year I did this, I took the word sweet very literally, and I bought sixteen different flavors of ice cream and then randomly matched them up on a bracket that I printed and used the school’s poster maker to enlarge. On Tournament Day, we taste-tested all sixteen flavors, voting after every match-up on our favorite. The winner? Brookie.

The following year, I was at a different school that had more students, and the cafeteria manager wasn’t too keen on my storing sixteen tubs of ice cream in her freezer, so I changed our field of competition to Oreos. Did you know there are over 80 flavors of Oreos in the world? Neither did I. Once again, I bought sixteen flavors and made a bracket. Since this school didn’t have a poster maker, I just made copies for each student to complete as we went. Once again, we taste-tested all sixteen flavors and voted after each match-up. The winner this time? Chocolate.

March Madness Oreo Bracket

Other options for your March Madness competition include flavors of pop/soda, candy bars (get the fun size), hard candy, crackers, or potato chips. Anything that has at least sixteen different varieties can be used. Or, if you are short on funds and/or time, shorten it to just the Elite Eight and only try eight varieties.

The Educational Justification

When I was doing this, I was blessed with administrators who valued cultural experiences and trusted my education judgment (one even came and joined in the fun!). If you need to provide some type of educational justification or simply want to add in a more academic component, there are several ways you can easily accomplish this. Students can practice adjectives by describing the different varieties of colors and flavors orally or in writing. Another option for a writing component is to write news “reports” about the faceoffs and final results of the tournament. You can even bring in some math practice by describing the vote results as ratios or percentages! The possibilities are endless.

I’ll admit that this is one of my more out-of-the-box ideas, but it is also a really fun activity that I highly recommend. There were times when dietary restrictions made finding a food or drink to use for our tournament a little more challenging, but there was never a year I couldn’t come up with something. Give it a try with your students, and let me know how it goes. Happy teaching, everyone!

Infinitive Fun

I’ve seen a lot of funny memes about infinitives, such as “To infinitive and beyond!” and “To infinitive or not to infinitive, that is the question.” And while they make me smile, they don’t always cause my students to smile. Another thing that doesn’t cause them to smile is most infinitive practice activities, which is why I created four of my own games. I won’t guarantee your students will love infinitive practice with them, but I will guarantee they are more fun than another worksheet!

Infinitives The Board Game

Infinitives: The Board Game allows students to practice forming sentences using be+adjetive combinations and infinitives. After we discuss the format and look over a list of the most common be+adjective combinations followed by infinitives, we practice making our own sentences. The game uses my zig-zag board (free download below the picture) and has cards with twenty-five different be+adjective combinations.

On a turn, the active player will draw a card and form a sentence with the be+adjective combination and an infinitive of his/her choosing. For example, a player might draw “be anxious” and give the sentence, “I am anxious to visit Italy someday.” If the sentence is grammatically correct, the player rolls the number cube and moves his/her piece. The first player to reach the finish square is the winner.

Infinitive Cover Up Game

Infinitive Cover Up Game

Cover Up games are hugely popular with my students, and Infintivie Cover Up is no different. This particular infinitive game focuses on noun + infinitive combinations. Each square of the board has a noun that can be followed by an infinitive. In order to cover the square, the student must form a sentence of his/her own choosing using the given noun and an infinitive.

As with all Cover Up games, the boards can be used in two different ways, complete cover (students each have their own boards and try to be the first to cover all the squares) or cover the most (two students share a board and try to have the most covers on the board by the end of the game). This particular game includes a split-board version for the complete cover version of the game. The split-board version has two boards on one page to reduce paper use when printing.

In order to gain the right to cover a square, a student rolls a twelve-sided die (or two six-sided dice), finds the square with the same number, and checks to see if it is covered or not. If the square is not covered, the student states a sentence with the given noun and an infinitive. (“The student’s plan to complete his homework on Friday was a good one.”) If the sentence is grammatically correct, the student covers the square. Popular covers in my class include milk jug lids, mini-erasers, plastic chips, or using a dry erase marker on a laminated board.

Infinitive Four In A Row

Another game that I have quite a few versions of is Four In A Row (context clues, verb tenses, modal verbs, adverbs of manner, and vowel sounds). This game plays like the classic children’s game, Connect Four, and is another common one in my classes (you can download a copy of the basic game board we use under the picture). This version, Infinitive Four in a Row, asks students to elicit free-form sentences using infinitives and pronouns. The game board has pronouns on the verticle axis, and students fill in the horizontal axis boxes by drawing verbs that are commonly followed by infinitives from a set of 52 cards.

On a student’s turn, he/she will decide which box he/she would like to try to claim and then form a sentence using the corresponding verb and pronoun with an infinitive of the student’s choosing. (“She would like to go to Rome someday.”) If the sentence is grammatically correct, the student claims the box by using a cover (the same things we use when we play Cover Up). The first student to cover four squares in formation is the winner.

Escape! The Infinitive Grid

I have several Escape! games (irregular verbs, irregular plural nouns, question words), and they have become quite popular with my students. Escape! The Infinitive Grid is no exception, and the goal is the same as the previous versions of the game: move from one side of the board to the other by forming sentences using the target grammar or vocabulary. This particular version targets forming sentences using infinitives that commonly follow verbs, nouns, and be+adjective combinations. It’s a free download below the picture and is a great way to review infinitives.

Conclusion

We don’t always use all four of these games when we practice infinitives in my classes, but we generally play at least one. My students have enjoyed being able to practice using infinitives without having to complete another worksheet. Besides being available as individual downloads, there is a bundle of all four games available, too. Happy teaching, everyone!